Description
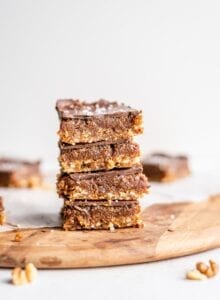
These triple layered bars are almost too easy to make! With minimal effort and ingredients, enjoy sweet and salted date caramel layered between a date walnut crust and chocolate topping.
Ingredients
For the Crust
- 3/4 cup (90 g) chopped walnuts or walnut pieces
- 3/4 cup (180 g) packed, soft and moist pitted dates
For the Caramel
- 1/2 cup (120 g) packed, pitted dates
- 1/4 cup (60 g) almond or peanut butter
- 1/4 tsp sea salt
For the Chocolate
- 1/2 cup (90 g) dairy-free chocolate chips or chopped dark chocolate
- 2 tsp melted vegan butter or coconut oil, optional*
Instructions
- Soak the Dates: Place the dates for the caramel layer in a bowl and cover with hot water. Soak for 20 minutes then drain well.
- Prepare: Line a standard-sized loaf pan with parchment paper.
- Blend Dates & Walnuts: Add the walnuts and dates to a food processor and mix for 30-60 seconds until it forms a crumbly but sticky dough. Firmly press the dough into the lined loaf pan until you have a firm, even layer. It helps to wet your fingers to prevent them from sticking to the dough.
- Blend the Caramel: Add the soaked dates to the food processor with the almond butter and sea salt. Process into a thick, creamy texture then evenly spread it over the bottom layer in the loaf pan using the back of a spoon or small spatula.
- Melt Chocolate: Melt the chocolate in the microwave in 15-20 seconds increments or using a double boiler. Stir until completely smooth. Using a spatula, evenly spread the melted chocolate over the caramel layer. Shake it back and forth gently or drop it on the counter top from an inch or two to help smooth and distribute the chocolate in an even layer. Sprinkle with a flaky sea salt if desired.
- Freeze: Place the loaf pan in the freezer until the chocolate has hardened.
- Slice: Once the chocolate is hard, pull the bars from the freezer and let them set sit a room temperature for about 10 minutes. Lift out of the pan and onto a cutting board. Run a sharp knife under hot water for 20 seconds, then wipe excess water off and use it to score the chocolate, running the knife over the score lines a few times until you’ve almost cut right through the chocolate layer. This will help prevent it from cracking when you slice it. Heat the knife under hot water again, dry and then follow the score lines to gently slice the bar into 8 squares or 16 small bars.
- Store the bars in an airtight container the fridge for up to 2 weeks or freezer for up to 3 months.
Notes
The melted butter or oil helps to spread the chocolate, soften it a little and prevent cracking when sliced.